Moving towards SwiftUI from UIKit: A SwiftUI Primer
Looking to get into mobile development, specifically with SwiftUI?
Moving towards SwiftUI from UIKit: A SwiftUI Primer
Apple introduced SwiftUI at WWDC in 2019 as a framework for creating declarative UI. Since then, it’s undergone nearly four years of revision and refinement. Although, unlike the Swift language itself, has lacked any kind of mechanisms for true community feedback and development. Despite this, it appears that Apple has, according to @timacfr, increasingly been dogfooding SwiftUI in apps like Weather and Shortcuts on iOS and in various system components and apps on macOS. macOS Ventura appears to have about 12% of its code written in SwiftUI, versus only 2% three years ago. That’s a very significant change, and very fast for an operating system that’s been around since PowerPC was the hot new thing.
And if the writing wasn’t already on the wall, Apple has, well, written it on the wall:

The official line during the WWDC 2022 State of The Platforms presentation was that “If you’re new to our platforms, or if you’re starting a brand new app, the best way to build an app is with Swift and SwiftUI.” That’s pretty remarkable. And it’s the clearest indicator (maybe ever) from Apple about what technologies to use and where their platforms are headed.
“If you’re new to our platforms, or if you’re starting a brand new app, the best way to build an app is with Swift and SwiftUI.”
So, if you haven’t started with SwiftUI, there’s no better time than now. But don’t head into your SwiftUI journey expecting it to work like UIKit. To move from UIKit to SwiftUI, you’ll need to shift your development thought process and leave behind a lot of UIKit muscle-memory.
Foundations
SwiftUI is enabled by Swift 5's Result Builders and DSL, or Domain Specific Language, features. This means that, unlike UIKit, SwiftUI is declarative rather than imperative. If you're familiar with web development, especially HTML or react, you'll recognize the declarative nature of Swift pretty quickly.
Creating a simple, static view is as straightforward as describing the layout and the components in that layout. In the example below, we create a small view that shows a photo of a snow leopard with some text underneath.
struct Content: View {

	var body: some View {
		VStack(alignment: .leading) {
			Image("snowleopard")
				.resizable()
				.frame(width: 50, height: 50)
			Text("Mac OS X Snow Leopard")
				.font(.headline)
			Text("Version 10.6")
				.font(.subheadline)
				.foregroundColor(.secondaryLabel)
		}
	}

}
In UIKit, you might have accomplished this by: setting up a new UIViewController`; declaring a number of `UIImageView and `UILabel` variables; initializing those variables in your view lifecycle functions (e.g. `viewDidLoad`); and then applying auto layout constraints to tell the system how everything should be arranged on screen. A simple view like this may have taken dozens of lines to write in UIKit. The SwiftUI version shown above is only 14 lines.
That's a nice way to save time and keep your code clean, but it's not where the magic really happens with SwiftUI.
View Diffing and Observation
In UIKit, you may be accustomed to updating the contents of views by either (A) observing values using KVO or Combine Publishers, (B) establishing a delegate pattern and imperatively fetching as-needed, or even (C) inject it during view loading. Depending on the complexity of the view or its data, this could mean writing custom implementations of `viewDidLoad`, `viewWillAppear`, `drawRect`, `viewWillLayoutSubviews`, `viewDidLayoutSubviews`, `viewDidAppear`, etc., etc. in addition to any data validation needed. You may have even run into issues where UI components appear out-of-sync with their backing stores.
Because SwiftUI is built on Swift 5's result builder features, the system is able to *automatically* update and maintain views as their contents change. If properly architected, this means that your UI is directly coupled to your data, thereby eliminating an entire class of bugs.
Each SwiftUI `view` is a lightweight, static object that the system can (essentially) hash. When changes are made to content in the view, the system can compare the existing hash with the newly computed hash. If there's a mismatch, the system will redraw any affected views and their contents, and then calculate a new hash. You can read more about how SwiftUI view diffing works in this article from Rens Breur. There's a lot going on behind the scenes to efficiently calculate exactly what needs to be redrawn.
To take advantage of the view diffing system, you'll make use of `ObservableObjects`. Whenever an `ObservableObject` publishes a change, your SwiftUI view responds and updates its content. Take a look at this simple example, extended from above:
struct Content: View {

	// 1
	@ObservedObject var viewModel = ContentViewModel()

	var body: some View {
		VStack(alignment: .leading) {
			// 2
			Image(viewModel.photo)
				.resizable()
				.frame(width: 50, height: 50)
			Text(viewModel.title)
				.font(.headline)
			Text(viewModel.versionNumber)
				.font(.subheadline)
				.foregroundColor(.secondaryLabel)
		}
	}

}
We first (1) add an `@ObservableObject` property to our view. This lets SwiftUI know that this object is going to publish changes, and that it should respond to those changes as they occur. Then, instead of statically typing out values, we set the values (2) to `@Published` properties from the `viewModel`.
Here's what that `ContentViewModel` looks like:
class ContentViewModel: ObservableObject {

	@Published var photo = "snowleopard"
	@Published var title = "Mac OS X Snow Leopard"
	@Published var versionNumber = "Version 10.6"

	func updateDetails() {
		// Fetch updated details from some data layer...
		let updatePayload = dataLayer.fetch()

		// Set the values from our update
		photo = updatePayload.photo
		title = updatePayload.title
		versionNumber = updatePayload.version
	}

}
Notice that `ContentViewModel` conforms to the `ObservableObject` protocol, and each of our values is marked with the `@Published` property wrapper. Under the hood, this property wrapper sets up a Combine pipeline which emits value changes on our property. When used in conjunction with SwiftUI, our view's content stays up to date as new values are published.
Creating Reusable Components
Here at JBS, we've found SwiftUI to be especially useful not only for state management, but for creating custom and reusable components. This is certainly possible with UIKit, but the overhead in SwiftUI is significantly reduced. I'll give two examples here that illustrate some of our approaches.
Custom Views
In the examples above, you've seen system views like `Text`, `VStack` and `Image`. SwiftUI lets you create non-standard custom views too; and they can be as complex or as simple as you need.
The example below demonstrates a custom email input field with custom padding, a nice little border, and some basic validation.
struct EmailField: View { // 1

    @Binding var email: String // 2

    @State private var isValid = false // 3

    var body: some View {
        VStack(alignment: .leading) { // 4
            TextField("Email", text: $email, prompt: Text("Email address"))
                .padding()
                .background {
                    RoundedRectangle(cornerRadius: 8)
                        .stroke(
		                        Color(.systemFill),
                            style: StrokeStyle(lineWidth: 1)
                        )
                }
                .padding(.horizontal)
                .onChange(of: email) { newValue in // 5
                    if newValue.count < 5 {
                        isValid = false
                    } else {
                        isValid = true
                    }
                }
            if isValid == false { // 6
                Text("Email address must be more than 5 characters long.")
                    .font(.caption2)
                    .foregroundColor(Color(.systemRed))
                    .padding(.horizontal)
            }
        }
    }

}
We first create a new view, called `EmailField` (1).
We then setup an `@Binding` variable (2), which binds changes in values between a given view and its parent. This lets whatever parent view that uses our `EmailField` have access to the email address the user enters.
Next, we create a private `@State` variable (3), `isValid` to store our email validation results. The property wrapper indicates to SwiftUI that the view may update this value itself, and that changes to the value should trigger a redraw.
Then we create a container view (4) with one of the standard SwiftUI views: `VStack`, and add a `TextField` and `Text` view to it. We can observe changes to our `@Binding` variable using the `onChange` modifier (5). The block in this modifier runs whenever the value of `email` changes so that we can validate the email address and update the `isValid` property. Of course, in a production environment you'd want to abstract the validation away from the view and decouple the business logic.
Finally, we make the display of our `Text` view conditional (6). This view will only get rendered when `isValid` is false. *Look ma, no Auto Layout!*
Looks like a lot? Using it in views throughout an app is as easy as calling:
EmailField(email: $address)Even a custom SwiftUI view like this dynamically responds to changes in layout, device orientation, and accessibility settings.
Reusable Modifiers
You may have noticed in the examples above that view declarations are often followed by function calls, known as view modifiers, like this:
Text(viewModel.title)
	.font(.headline) // <--
View modifiers allow us to style, layout, and update views in different ways. In the example above, the `font` view modifier sets the label's font to the system "headline" style. This particular example is a straightforward system-provided view modifier.
We can, however, make our own view modifiers. One particularly useful example is a custom `redacted` modifier. The system `redacted` modifier lets us obfuscate views by replacing them with a subtle rectangle:
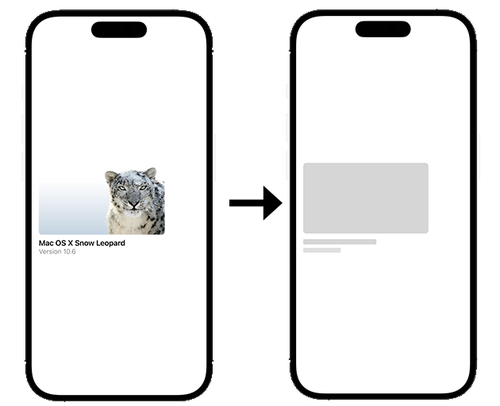
The system modifier is static. Once set, a view will remain "redacted" unless the modifier is removed. We can create our own version of the redacted modifier that gets conditionally applied. This is especially useful in cases where we want to show placeholder content until our data loads.
extension View {

	@ViewBuilder
	func redacted(when isRedacted: Bool) -> some View {
		if isRedacted {
			self
				.redacted(reason: .placeholder)
		} else {
			self
		}
	}

}
This custom modifier extends the SwiftUI primitive type, `View`, by adding a new function `redacted(when:)`. Our function then returns an updated `View` based on the provided condition. Note the `@ViewBuilder` designation, which lets SwiftUI know that we're returning a conditional view (and the underlying returned types may not be exactly the same). For an in-depth look on `@ViewBuilder`, check out this blog post from Antoine Van Der Lee.
We can then apply this modifier to any of our views, and even pass in a published value from our view model to have those views respond to changes.
Text(viewModel.title)
	.font(.headline)
	.redacted(when: viewModel.isLoading)
In this example, when our view model indicates that it's loading, the view will be redacted. Otherwise, we'll show the view with its content.
View modifiers are super powerful. We've created custom view modifiers to handle complex touch gestures, improve accessibility and Voice Over labeling, and standardize design guidelines such as padding and colors — just to name a few.
Conclusion
I'm a huge advocate for SwiftUI. Here at JBS, we've seen myriad improvements in production projects that have moved from UIKit to SwiftUI. It takes engineering and design teams less time to iterate through changes — so much so that we've been able to work in real-time with many designers to tweak layouts on the fly. And, as mentioned before, it's eliminated entire classes of bugs by coupling view state and data directly to the views themselves.
Even if you're not quite ready to move your project over to SwiftUI from UIKit, the two are interoperable so it's possible to begin transitioning bits and pieces over time without starting from scratch.
The JBS Quick Launch Lab
Free Qualified Assessment
Quantify what it will take to implement your next big idea!
Our assessment session will deliver tangible timelines, costs, high-level requirements, and recommend architectures that will work best. Let JBS prove to you and your team why over 24 years of experience matters.


